How to Stage a Home for Sale: A Step-by-Step Guide for Agents
Feb 23, 2026 · 8 min read
A practical guide to staging a home for sale — from decluttering and deep cleaning to furniture arrangement and virtual staging options. Includes physical vs. AI staging cost comparison.
Home staging is the single most controllable variable in how quickly a property sells and at what price. Unlike location, lot size, or school district — all of which are fixed — the quality of a home's presentation is entirely within the agent's and seller's control.
This guide covers the complete staging process for real estate agents and sellers: what to do, in what order, for what cost, with specific guidance on when physical staging makes sense versus when AI virtual staging delivers better ROI.
Why Staging Works: The Psychology of Homebuying
Buyers make emotional decisions and justify them rationally. Research on decision-making in real estate consistently shows that buyers decide whether they want a property within the first 90 seconds of entering — and online, within 3–5 seconds of seeing the listing photos.
Staging works because it does three things that matter to buyers:
- Clarifies scale and proportion — empty rooms are genuinely difficult to visualize. Furniture creates reference points that help buyers understand how their own belongings will fit.
- Creates emotional connection — a well-staged room looks lived-in, warm, and aspirational. Buyers project themselves into the space.
- Eliminates distraction — personal items, clutter, and non-neutral decor cause buyers to focus on the seller's life rather than imagining their own.
The National Association of Realtors reports that staged homes sell 73% faster than unstaged equivalents. Zillow data shows that homes with high-quality photos receive 47% more per square foot. The math is compelling regardless of property price point.
Step 1: Declutter and Depersonalize
Before any staging begins, the property must be stripped of everything that makes it feel like someone else's home. This is the most psychologically difficult part of the process for sellers — and the most important.
Declutter systematically:
- Remove 50–75% of all items from every room. This sounds extreme; it rarely is.
- Clear all kitchen countertops. Leave out only 2–3 objects maximum.
- Remove all personal photos and family mementos.
- Empty closets to 50% capacity — buyers open closets and full ones signal insufficient storage.
- Clear nightstands down to 1–2 items per side.
- Box and remove everything from under beds and in unused spaces.
Depersonalize:
- Remove all personal photographs
- Take down children's artwork and school items
- Remove religious items, political items, and strongly personal collections
- Replace personalized items (monogrammed towels, name plaques) with neutral alternatives
The goal is a home that feels like a high-end hotel: comfortable and tasteful, but not specifically anyone's.
Step 2: Deep Clean and Repair
No amount of staging overcomes visible dirt, odors, or deferred maintenance. Buyers interpret these as evidence of poor overall property care.
Cleaning priorities:
- Steam clean or replace carpets — carpet odors are among the most common reasons buyers reduce offers
- Clean all windows inside and out — clean windows dramatically increase natural light
- Degrease kitchen surfaces, appliances, and range hood
- Regrout or replace visibly dirty tile grout
- Touch up paint on walls, baseboards, and doors
Repairs to address before staging:
- Running toilets or dripping faucets — suggest larger plumbing issues to buyers
- Sticking doors and windows — suggest structural settlement or moisture issues
- Cracked caulk in bathrooms — suggests water intrusion risk
- Missing or broken hardware — inexpensive to fix, high visibility impact
The general principle: fix anything that a buyer might interpret as evidence of deferred maintenance. The cost of fixing small items is always less than the price reduction demanded by buyers who notice them.
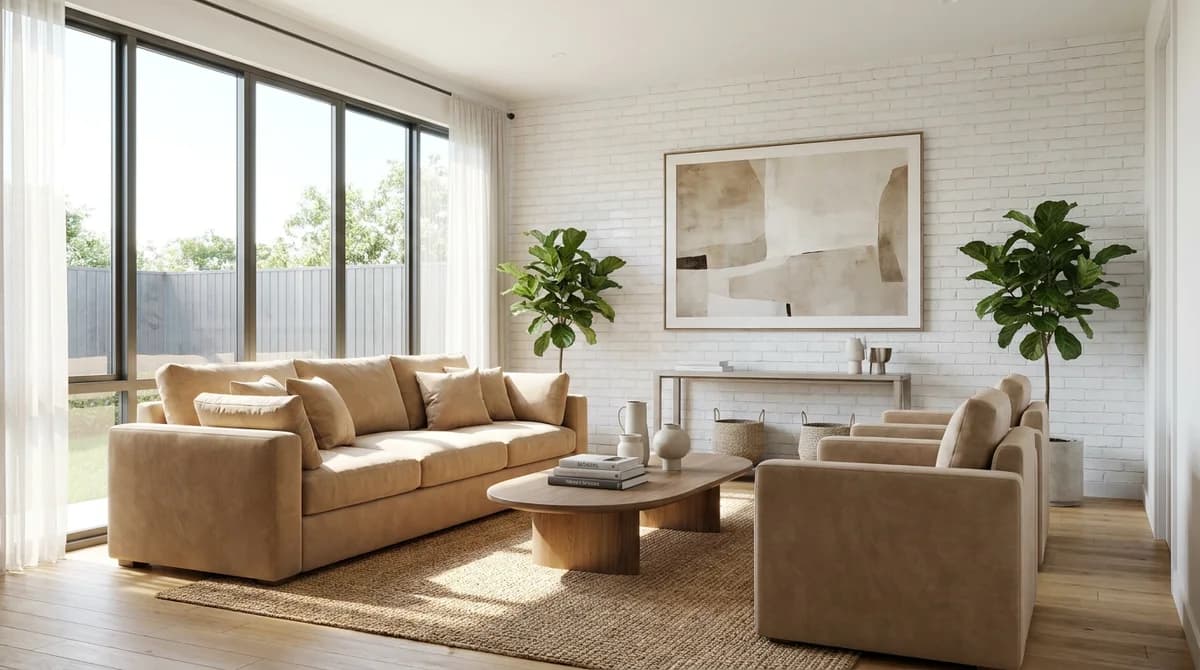
Step 3: Furniture Arrangement and Editing
Even in occupied homes with good furniture, the existing arrangement may not optimize the room for showings.
Key furniture principles for staging:
- Create clear traffic flow through every room — buyers need to move comfortably, not navigate around furniture
- Float furniture away from walls — pulling furniture 12–18 inches from walls makes rooms feel larger and more designed
- Create conversational groupings — seating arranged to face each other rather than facing only the TV
- Remove excess furniture — most rooms are over-furnished for showings. Removing one or two pieces typically makes a room look larger and cleaner.
- Ensure the primary seating area is visible from the doorway — buyers form their impression of a room in the first few seconds from the doorway
Room-specific priorities:
- Living room: Sofa and chairs in conversational arrangement, clear pathway to windows, artwork at eye level
- Dining room: Table centered under chandelier, chairs evenly spaced, table set simply
- Bedroom: Bed centered on the main wall, matching bedside tables, clear floor space on both sides
- Kitchen: Completely clear countertops, just one or two styled items maximum
Step 4: Style and Add
After decluttering, cleaning, and rearranging existing furniture, selective additions complete the staging.
High-impact additions:
- Fresh flowers or plants — living green is consistently the highest-impact addition per dollar spent. A $15 bunch of tulips in a kitchen photographed better than any other single staging investment.
- White towels and bath accessories — hotel-quality white towels transform a bathroom for $30–50
- Fresh bedding — a white duvet cover and neutral cushions update a bedroom in 15 minutes
- Mirrors — strategically placed mirrors amplify natural light and make rooms feel larger
Avoid these common additions:
- Potpourri or artificial scents (suggest something being hidden)
- Plastic plants (worse than no plants)
- Seasonal or holiday decoration (date the listing)
- Overly personal decorative objects
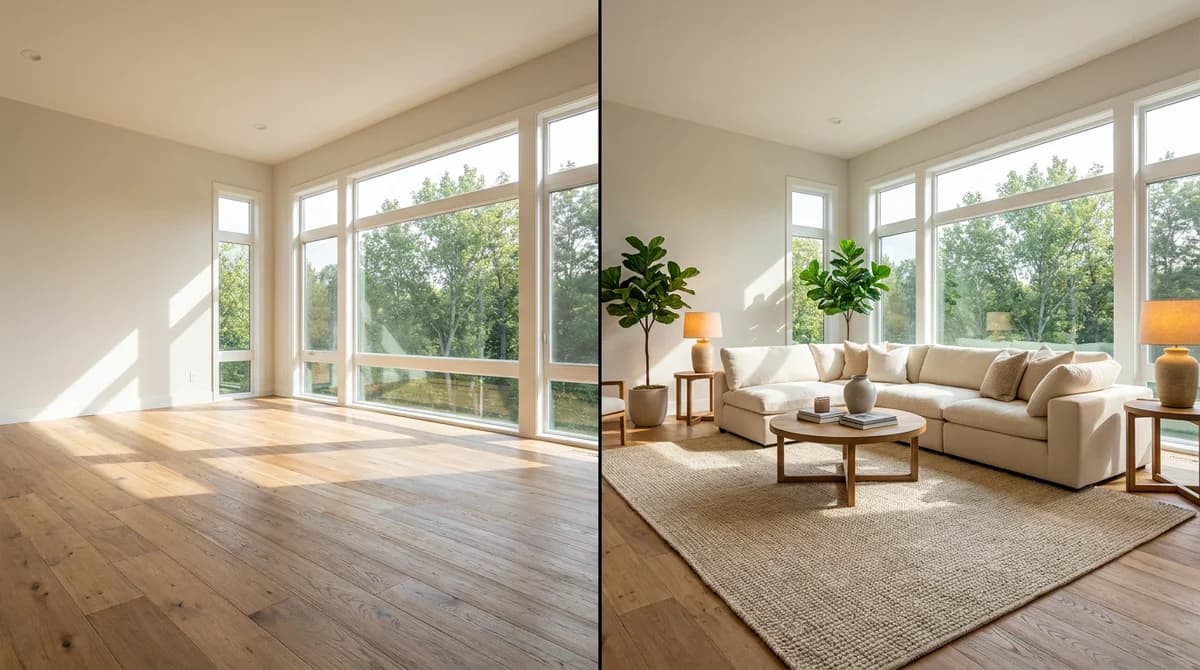
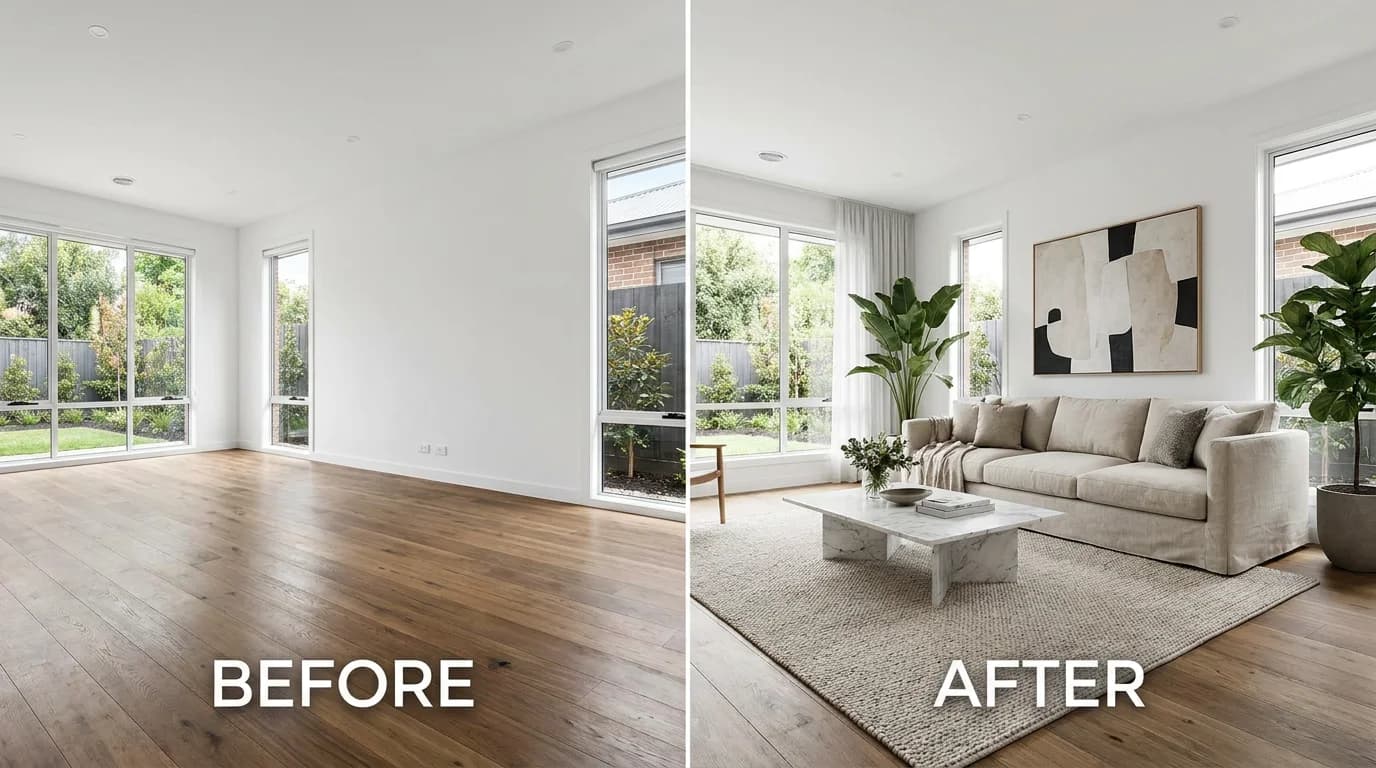
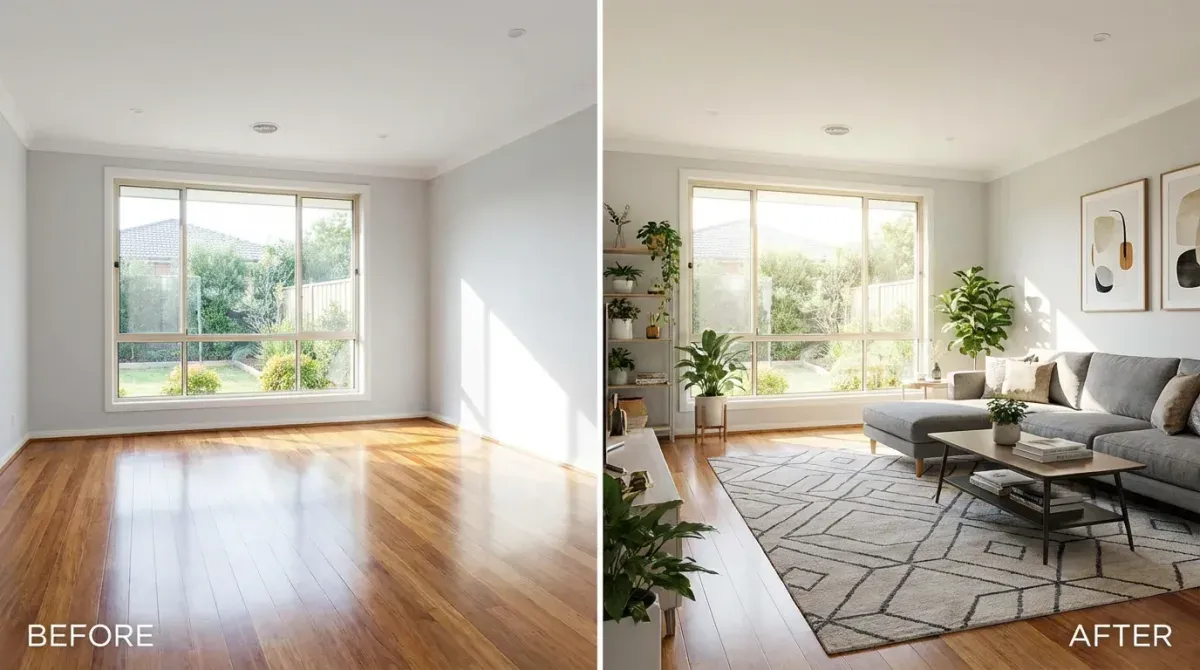
Step 5: AI Virtual Staging for Empty Rooms
Empty rooms are the hardest to stage effectively with physical staging — hiring furniture is expensive and logistically complex. For empty properties, AI virtual staging is typically the most cost-effective approach.
When to use AI virtual staging:
- Property is completely vacant
- Furniture is removed during showings for specific rooms
- A room photographs poorly with existing furniture and needs a visual alternative
- Budget doesn't allow for professional virtual staging ($50–150/room)
How it works: Upload a photo of the empty room to RoomLift. Select the staging style appropriate for the property and target demographic. Receive a photorealistic staged image in under 60 seconds. Download and include in the listing with appropriate disclosure.
Disclosure requirements: Most MLS platforms require disclosure that photos have been digitally enhanced. Include a note in the listing description: "Photos include digitally staged renderings. Contact agent for current property condition."
Cost comparison:
| Staging type | Cost per room | Turnaround | Quality |
|---|---|---|---|
| Physical staging | $200–600 | 3–7 days | Highest |
| Professional virtual staging (human) | $50–150 | 24–48 hours | High |
| AI virtual staging | $1–5 | Under 60 seconds | High |
| No staging | $0 | Immediate | Lowest |
For most vacant property situations, AI virtual staging delivers the best combination of quality, cost, and speed.
Step 6: Photography
Staging is only effective through good photography. Everything in the previous steps exists to serve a compelling photograph.
Photography priorities:
- Use a professional photographer whenever possible. The difference between professional and amateur real estate photography is immediately visible.
- Schedule for optimal natural light — typically mid-morning on a bright day
- Ensure all lights are on, including under-cabinet lighting in kitchens
- Open all curtains and blinds fully
- Clear the street of vehicles visible from exterior shots
For agents using AI virtual staging: upload the photos in the same session as they're taken, before the final listing is prepared. The AI staging turnaround is fast enough that staged and unstaged photos can be in the same listing gallery.
Physical vs. AI Staging: When to Use Each
| Situation | Recommended approach |
|---|---|
| Vacant property, limited budget | AI virtual staging throughout |
| Vacant property, premium listing | Physical staging for key rooms, AI for secondary rooms |
| Occupied property with good furniture | Physical staging (declutter, rearrange, accessorize) |
| Occupied property with poor furniture | Physical staging + AI for rooms that photograph badly |
| Investment property showing | AI virtual staging |
| New construction show home | Physical staging |
The right answer depends on budget, property type, target market, and the quality of existing furnishings. Most agents develop a systematic approach that combines physical staging techniques with AI virtual staging for specific applications.
Sources & References
- National Association of Realtors (2024). Profile of Home Staging. NAR Research Reports.
- Real Estate Staging Association (2024). Home Staging Statistics. RESA Industry Report.
- HomeLight (2024). Top Agent Insights Report. HomeLight Research.
Ready to transform your listings?
Stage your first room in 20 seconds. No design skills needed.